

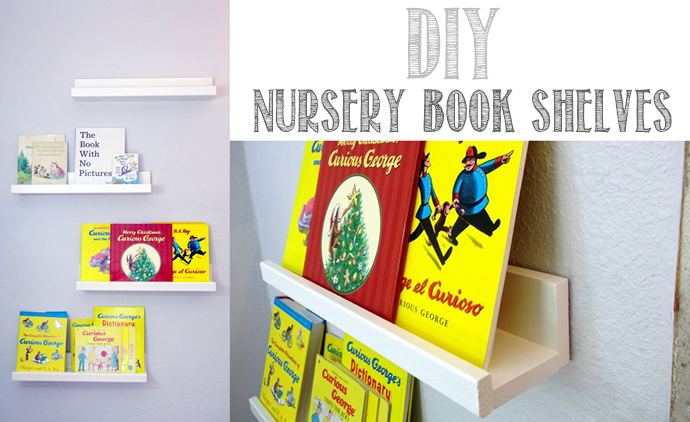
I spent last week working on another favorite project of mine. After seeing this project on Pinterest, I impulsively decided to make these shelves. They would fill a dead space in the nursery, provide a way to store all the books we already have, and cost far less than buying pre-made shelves.
While the shelves ended up being more complicated than I thought, they were still a pretty simple project. They did end up taking 3 days to complete, but this had more to do with the multiple trips to Home Depot and two coats of paint than anything else. I'd still recommend them to anyone looking for a simple, DIY solution when it comes to book storage in a small nursery space.
Let's get right into it, shall we?
So these book shelves were necessary for us because of this space:

Enter: DIY ledge book shelves.

So how do you make these things, and how much does it all cost?
Supplies Needed
- Two 8-foot 1x4's
- One 8-foot 1x2
- Wood glue
- Clamps (optional)
- Finishing nails
- Paint/Stain
- Shelving brackets & screws (optional)
- Rubber bumpers (optional)
- Masking/Painter's tape
- Inky marker
- Wall anchors
- Screws
- Tools (hammer, screwdriver, drill, level)
Cost
The cost really depends on how many of these supplies you already have at home. If you are a regular DIYer, you just might have everything on hand already. We already had wood glue, tape, markers, paint, and tools. I bought clamps, nails, anchors, and screws because these are things that will be essential for our household projects in the future. Here's how my costs added up:
- $7.00 for the lumber
- $20.00 for two 6" clamps
- $5.00 for a box of finishing nails
- $9.00 for keyhole brackets
- $1.50 for rubber bumpers
- $4.00 for a box of wall anchors
- $5.00 for a box of 50 #8 2-inch screws
Without the clamps (which really are optional), that brings my total cost to $21.50. I got the clamps because Levi is building up his wood-working studio in the garage, so these will be essential tools for any number of future projects. With my total cost coming to $41.50, that still makes each shelf just over $10.00 each. I can totally live with that.
Process
First, I had to assemble my initial supplies.

The great thing about buying lumber at Home Depot is that they'll cut it for free. I had each of my boards cut into 23-inch sections (just in case they weren't entirely accurate with their cuts on an 8-foot board).
The next step isn't entirely necessary, but it makes a HUGE difference:
SAND THE BOARDS.
Seriously. Your paint will stick better, they'll feel smoother, and they'll look nicer.

It took me less than 15 minutes to sand every surface of every board. Then I ran some tack cloth over the boards to pick up all the dust.
With the boards cleaned, it was time to start assembling them. Out came the wood glue.

If you've never worked with wood glue, just know a thin layer goes a long way. Then I used the (optional) clamps.

Since I only bought two clamps, I had to wait half an hour for each shelf to dry. Then I hammered in some nails along each seam.

In a matter of a few hours (basically during breaks between other chores), the shelves were roughly assembled.

Then it was time to paint the shelves. It would be just as easy to stain the shelves or leave them raw, but the 1x2 I had chosen had lots of stamps all over it, so paint was all I could use to cover that up. I went ahead and did two coats of paint (it was technically paint + primer), so that took a few more hours (the humidity prolonged the paint's drying time).

By this point, it was time to call it a night.
The next day, I attached some keyhole brackets to the back of the shelves by first marking where the brackets would go, then drilling pilot holes for the bracket screws, and then attaching the brackets. I did find that these particular brackets didn't have enough room for the screw heads they would hang on. This was easily fixed by screwing the brackets on almost all the way. That extra wiggle room provided enough space for the larger screw heads to slip up and into the locking part, and the brackets are still snugly attached to the shelves.

When it's time for this step, I should point out that it's entirely optional. You could choose to screw straight through the shelves and into your walls, but I decided I wanted these shelves to be more mobile in the future. Plus, it would be easier to hang them on anchored screws this way.
Since I was adding these brackets, meaning the shelves would sit a bit off the wall, I added rubber bumpers to the bottom of each shelf. This will keep the shelves level, but it will also help evenly distribute the weight of the shelves.

Then it was time to hang the shelves. After a lot of thought, I decided to use the masking tape method to ensure level shelves. You rip off a piece of tape the same length as the shelf, and then you level the tape on the wall. This way you can just set the shelf over the tape and have confidence it is already level.
Here's what my wall looked like once I got the tape in place.

Then comes the marking trick. By using a very "inky" marker, I was able to dot over the brackets, press the shelves against the tape, and transfer the marks. You could also use chalk (which would be less messy), but I realized too late that I didn't have any chalk at home.
After this it was time to drill the holes for the anchors. I drilled slightly below and centered between the two bracket marks to ensure the shelves would sit nicely on the screws.
When drilling for anchors, make sure you use a drill bit the same size as the anchor, and drill in far enough for the whole anchor.
Note: If you're going to put nothing but little, paper books or board books on these shelves, the anchor may not be entirely necessary. Same thing if you're able to drill into studs. We have plaster walls, however, and this particular stretch happens to have no studs. Go figure. So using anchors and making sure we hit the lath works just fine.


It's pretty simple after this step. Screw the screws into the anchors. You can use a drill, or you can just use a screwdriver. Leave the screw out of the anchor just a little but to make sure your bracket has something to grip. Then just slide the shelf onto the screw.
This was my progress halfway through.

It was looking and feeling great so far, but I discovered on the third shelf that hitting anchors in with a hammer is enough to dislodge the top shelf, which proceeded to tumble down and hit the other shelves off. ARGH.
After finishing the hardware installation and THEN putting up the shelves (lightly tapping them firmly onto the brackets with a hammer), I finally had my finished project!

They even look great and even from the side, thanks to those rubber bumpers.

I'm so excited about how they turned out!
Again, I know this post was pretty long and detailed, but if you're anything like me, knowing every step AND some helpful tips makes any project easier. If you're thinking about simple ledge shelves, I'd highly recommend this project!

Next project should be up in two weeks. It's a DIY light fixture, and I am also really excited about it. It's one of the cutest things EVER!
-
Keep it real, y'all,

No comments:
Post a Comment